Pour over coffee is one of my favorite brewing methods. With all of the brewing parameters that can be manipulated, the technique generally allows for good control over the final product. It's also pretty easy to learn and start cranking out delicious coffee right away. Combine all that with the blissfully therapeutic nature of slowly and repetitively pouring water over coffee grounds, and you've got one of my favorite ways to caffeinate.
In this guide, I wanted to share my process for making the best pour over coffee at home, including what you'll need to make it and a few subtle brewing details that are often overlooked.
The Equipment You'll Need for a Pour Over

To make the best pour over coffee, you'll need the following equipment:
- Hario V60 or comparable pour over coffee dripper.
- Hario V60 filters (or filters for your specific pour over dripper).
- Burr Grinder
- Gooseneck Water Kettle
- A kitchen scale
- A timer (built-in to the kettle above or use your phone)
- A coffee cup
What Pour Over Coffee Ratio Works Best?

The best pour over coffee ratio we have found so far is the following (for a single serving):
- Roast: Medium
- Coffee: 20 g per serving
- Water: 300 g per serving (~40 g for blooming and 260 g for brewing)
- Contact Time: 3 minutes
- Temperature: 205°F
- Grind: Fine to Coarse (7 of 16 on Grinder)
To make two servings, simply double the weight of coffee and water. This would be close to the maximum volume a Hario V60 (size 02) can accommodate before overflowing at the top, so if you are wanting to make more servings you'll either have to work in batches or switch to a different type of pour over dripper (a Chemex, while slightly different, could be a suitable alternative).
If making a double batch, we also recommend brewing into a larger vessel first and then pouring into individual cups for serving. We use our French press carafe for this as its size and pouring spout work well for pouring into individual cups. Hario also makes specialized glass carafes that are made to work with their drippers.
The above ratio and parameters are based on our preferred roast type for this style of coffee preparation. For lighter or darker roasts, you may need to change your temperature or grind accordingly. This is discussed more at the end of the guide.
Pour Over Coffee Recipe

To make the best pour over coffee at home, we recommend the following steps for a single serving (parentheses denote adjustments for a double serving):
- Set your kettle to 205°F and hold until ready.
- Grind your coffee to a medium-fine setting, roughly 7 out of 16 on a multi-setting grinder.
- Place a mug on your scale and on top of it place your pour over dripper containing a fresh filter paper.
- Wet the filter paper with hot water from your kettle and ensure the paper is making good contact with the pour over dripper.
- Empty the water from the mug into the sink and place the mug back underneath the pour over dripper.
- Add the coffee grounds to the filter paper, shake/tap to level the grounds, and then make a slight indentation in the middle of the grounds with your index finger.
- Tare the scale so that it reads 0 g.
- Start the timer on your kettle or phone.
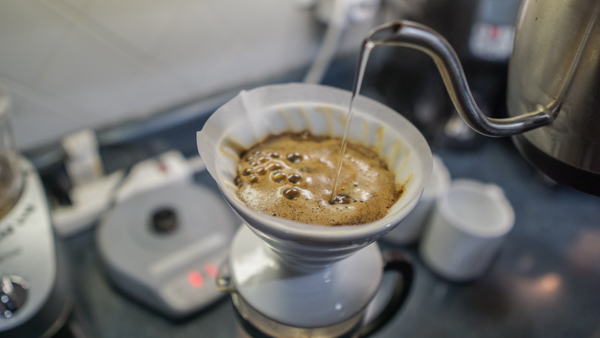
- In a slow, circular motion, add enough water to just barely wet all of the coffee grounds, roughly 40 grams (80 grams for a double serving).
- Wait approximately 30 seconds for the coffee to bloom. Bubbling in the coffee bed should stop or slow significantly and little if any coffee should be dripping into your cup.
- After blooming, start at the center and slowly pour the water in a spiral pattern outwards toward the edges of the dripper without actually touching the edges of the filter or dripper.
- Pour slowly and continuously while maintaining a constant liquid level until you reach 300 g (600 g for a double serving).
- Target 300 g in approximately 2.5 minutes and 600 g in 4.5 minutes. It will take an additional 30-60 seconds for the coffee to finish filtering through the dripper.
- When the water level has dropped such that you can see the coffee grounds, move the mug and pour over dripper to the sink and place the dripper in the sink to finish draining.
- Enjoy your coffee!

Some Pour Over Coffee Theory and Science

In steps 1 and 2, we recommend a temperature of 205°F and a 7/16 grind setting which coincides with our preferred settings for a medium roast coffee. For a lighter roast coffee you may want to keep these settings, but for a darker roast coffee you may want to grind one or two steps coarser and brew a few degrees cooler (between 190°F and 200°F depending on roast). This will help prevent over-extraction of more bitter components that come out in darker roasts.
In step 8, we bloom the coffee for about 30 seconds in order to release trapped carbon dioxide gases that build up during roasting. Blooming also allows for the hot water to come in contact with the surface of every grain and get the extractable compounds ready to go.
In step 11, we mention pouring in a spiral motion while avoiding the sides of the filter. This is done to help provide an even extraction across all the coffee grounds and to minimize any potential water channeling along the outsides of the filter. The ceramic dripper itself also incorporates ridges on the interior walls to help minimize this (which is why pre-wetting is also important), but it is still good practice to avoid pouring directly on the edges all the same.

In step 12, we recommend pouring slowly, continuously, and attempting to maintain a set liquid level during the brew. There are many theories as to the best practice here, but maintaining a constant liquid level is a good place to start.
The reason for this is because it helps control the contact time variable within the brewing process. In a vertical column, like in a pour over, the speed at which water flows is based on the liquid level height. Any additional volume of water creates more driving head (pressure), and with fixed resistance from the coffee grounds (resulting in head loss from friction), this can only mean that the water will pass through faster and thus reduce the contact time.
By maintaining a fixed liquid level, the speed at which water passes through the grounds will be maintained as close as possible, and the extraction will be uniform throughout most of the brewing process. This is also why we recommend removing the filter from the cup when you can start to see the coffee grounds as at this point the liquid level is quite low and the contact time on the grounds will increase considerably- running a risk of over-extracting components that contribute off-tastes.
How do you prepare your pour over coffee at home? Comment below to share any tips you have picked up along the way!
Disclaimers: Our site uses demographic data, email opt-ins, display advertising, and affiliate links. Please check out our Terms and Conditions for more information.